Toolkit on accessibility for people with visual impairment for lecturers
Table of Contents
- Chapter 1: Introduction to accessibility
- Chapter 2: Training environment
- 2.1 Teaching in an accessible environment
- 2.2 Preparing the room
- 2.3 Let the user decide the format
- 2.4 Teaching strategies
- 2.5 Providing accessible information
- 2.6 Participation online
- 2.7 Accessible digital formats
- 2.8 Accessible documents
- 2.9 Accessible handouts
- 2.10 Summary
- Chapter 3: Empathy Exercises
- Chapter 4: Facilitation
Chapter 1: Introduction to accessibility
1.1 Legislation
Authors: Pavol Korček, Branislav Mamojka, Slovak Blind and Partially Sighted Union, Slovakia
1.1.1 General documents
Accessibility of the environment, transport, information, services and goods is regulated by Slovak legislation as well as legislation of the European Union. The different areas of accessibility are handled differently in terms of scope and content. The legislation relates to the technical and operational aspects of accessibility as well as the right to accessibility and its enforcement.
The basic extent of the recognised rights is declared in the UN Convention on the Rights of Persons with Disabilities.
Accessibility is a cross-cutting principle of this Convention but it is specifically dealt with in Articles 9, 19, 21 and 30.
The Convention takes precedence over Slovak legislation, which means that in the event of a conflict between Slovak legislation and the Convention, the Convention applies.
Clarifications of the interpretation of selected articles of the Convention are issued by the UN Committee on the Rights of Persons with Disabilities in the form of so-called General Comments. The issue of accessibility is dealt with specifically in General Comment No 2 of the UN Committee on the Rights of Persons with Disabilities, Article 9 Accessibility, and also General Comment No 5, Article 19 Right to independent living and being included in the community (in particular paragraphs 14, 16.b, 78).
1.1.2 Physical environment
In the area of accessibility of the physical environment, Decree No 532/2002 Coll. of the Ministry of the Environment of the Slovak Republic is particularly important as it sets out the details on general technical requirements for construction and general technical requirements for buildings used by persons with limited mobility and orientation. Provisions relating to buildings used by persons with reduced mobility are specified particularly in Part 4 of the Decree and in the annex to the Decree.
Roads, cycling infrastructure and their accessibility are regulated by TP 048 – Technical conditions – Design of barrier-free measures for persons with reduced mobility on roads and TP 085 –Technical conditions – Design of the cycling infrastructure.
1.1.3 Transport
Accessibility in transport is regulated by Regulation of the European Parliament and of the Council No 181/2011 on the rights of passengers in bus and coach transport amending Regulation (EC) No 2006/2004.
The following documents relate to this Regulation: Act No 56/2012 Coll. on Road Transport as amended.
Accessibility in the area of transport is regulated by other EU Regulations on Passenger Rights (1107/2006 in air transport, 1371/2007 in rail transport and 1177/2010 on travelling by sea and inland waterway). Accessibility of bus and railway stations, airports and ports is also covered by Decree No 532/2002 mentioned above.
1.1.4 Information
Accessibility of information is regulated by Act No 95/2019 Coll. on information technologies in public administration as amended.
Decree No 78/2020 Coll. of the Office of the Deputy Prime Minister of the Slovak Republic for Investment and Informatization on standards for information technologies in public administration is of particular importance as well, as it sets mandatory standards for information technology in public administration. Observing these laws guarantees, amongst other things, the accessibility of public administration information systems for people with disabilities.
Another vital piece of legislation in this area is Directive (EU) 2016/2102 of the European Parliament and of the Council of 26 October 2016 on the accessibility of websites and mobile applications of public sector bodies. In the Slovak Republic, the provisions of the Directive were transposed into Decree No 78/2020 Coll. of the Office of the Deputy Prime Minister of the Slovak Republic for Investment and Informatization on standards for information technologies in public administration.
When naming legislation in the field of accessibility of information, we must not forget Act No 211/2000 Coll., as amended, on free access to information. The Act regulates the conditions, procedures and scope of free access to information. Entities that are obligated to make information available and to comply with the provisions of the Act include municipalities, cities and self-governing regions, and the Act guarantees access to the information available to them.
A natural person with a sensory disability is entitled to request access to information in an accessible form, in the case of a blind person in Braille, in the case of a visually impaired person in an enlarged font. Of particular importance is the provision of §16 (7) enabling the applicant and the obligated person to agree on a different way of making the information available. This relates mainly to information provided in the form of an accessible electronic document, which is becoming useful for more and more visually impaired people.
1.2 Universal Design
Author: Pavol Korček, Slovak Blind and Partially Sighted Union, Slovakia
Universal design is classified under the term human-centred design, i.e. approach focused on people’s diverse needs, demands and capabilities. Terms, such as Design for All or Inclusive Design, are used synonymously.
According to the UN Convention on the Rights of Persons with Disabilities, universal design "means the design of products, environments, programmes and services to be usable by all people, to the greatest extent possible, without the need for adaptation or specialized design. Universal design shall not exclude assistive devices for particular groups of persons with disabilities where this is needed."
Universal design focuses on the diversity of users of the environment (e.g. persons with disabilities, elderly people, foreigners or tourists) while trying to create the most equal conditions for them all. This approach is characterised by 7 principles; by adhering to these we can significantly improve environment as well as information accessibility even for the blind or partially sighted.
1.2.1 Principle 1: Equitable Use
The design is useful and marketable to people with diverse abilities.
Guidelines:
- Provide the same means of use for all users: identical whenever possible; equivalent when not.
- Avoid segregating or stigmatizing any users.
- Provisions for privacy, security, and safety should be equally available to all users.
Every person has the right to participate in all activities and to use all services. Any elements or manifestations of segregation of people with disabilities are undesired. Example: A website of a city or a municipality which is designed and created universally from start (following accessibility rules). In this case, even a blind person who uses a screen reader to read web pages can easily access the published information.
1.2.2 Principle 2: Flexibility in Use
The design accommodates a wide range of individual preferences and abilities.
Guidelines:
- Provide choice in methods of use.
- Accommodate right- or left-handed access and use.
- Facilitate the user's accuracy and precision.
The design of flexible spaces and elements takes into account the individual demands of users and also allows for multi-purpose use of spaces. The flexibility of spaces and elements increases the quality of the environment for all users.
Example: A museum where a visitor can read descriptions of individual exhibits or can also listen to them by using an audio guide.
1.2.3 Principle 3: Simple and Intuitive Use
Use of the design is easy to understand, regardless of the user's experience, knowledge, language skills, or current concentration level.
Guidelines:
- Eliminate unnecessary complexity.
- Be consistent with user expectations and intuition.
- Arrange information consistent with its importance.
- Accommodate a wide range of literacy and language skills.
- Provide effective prompting and feedback during and after task completion.
Example: Simple and intuitive solutions – such as easy-to-find contrast and embossed push-button markings.
1.2.4 Principle 4: Perceptible Information
The design communicates necessary information effectively to the user, regardless of ambient conditions or the user's sensory abilities.
Guidelines:
- Use different modes (pictorial, verbal, tactile) for redundant presentation of essential information.
- Maximize "legibility" of essential information.
- Provide compatibility with a variety of techniques or devices used by people with sensory limitations.
- Differentiate elements in ways that can be described (i.e., make it easy to give instructions or directions).
- Ensure compatibility with different techniques or equipment used by people with sensory impairment.
Each piece of information provided to users should be conveyed in at least two modes of sensory perception; the most commonly used combinations being visual with auditory, or visual with tactile modes. Various assistive technologies may be used to convey web information.
Example: Verbally stating important contact information which is referred to by a TV moderator during their speech and which is graphically shown on the TV screen. This way, the information is accessible not only to a blind or partially sighted person but also to a person who is not in the vicinity of the TV.
1.2.5 Principle 5: Tolerance for Error
The design minimizes hazards and the adverse consequences of accidental or unintended actions.
Guidelines:
- Arrange elements to minimize hazards and errors: most used elements, most accessible; hazardous elements eliminated, isolated, or shielded.
- Provide warnings of hazards and errors.
- Provide fail safe features.
- Discourage unconscious action in tasks that require vigilance.
When designing and operating buildings, it is important to eliminate all the risks which could endanger the health of users or could cause an accident. The principle of tolerance for error is, for example, implemented in the design of products and technical devices.
Example: A software application which provides guidance if the user makes an unsuitable choice or a wrong step.
1.2.6 Principle 6: Low Physical Effort
The design can be used efficiently and comfortably and with a minimum of fatigue.
Guidelines:
- Allow user to maintain a neutral body position.
- Use reasonable operating forces.
- Minimize repetitive actions.
- Minimize sustained physical effort.
In order to increase the quality of user’s experience with objects, it is suitable to apply a variety of elements or electrical supportive mechanisms which make the use of individual space or items easier.
Example: Automatic doors which allow a person in a wheel-chair to move easily from one room to another.
1.2.7 Principle 7: Size and Space for Approach and Use
Appropriate size and space is provided for approach, reach, manipulation, and use regardless of user's body size, posture, or mobility.
Guidelines:
- Provide a clear line of sight to important elements for any seated or standing user.
- Make reach to all components comfortable for any seated or standing user.
- Accommodate variations in hand and grip size.
- Provide adequate space for the use of assistive devices or personal assistance.
The size of universally accessible and used spaces is designed so that they can be used by all people including users with limited mobility. The main measure to test universal accessibility of spaces is sufficient door opening width and the size of the wheel-chair manoeuvre area. The interior design of spaces has to take into consideration the demand of all seated as well as standing users. Of importance is the meticulous application of ergonomic principles.
As stated above, the mentioned concept/philosophy of universal design is based on respecting the diversity of people including visually impaired people. The application of its principles in practice will enable people with visual impairments better and easier participation in every-day activities with higher levels of independence.
1.3 Bibliography
- Všeobecný komentár č. 2 (2014), Výbor pre práva osôb so zdravotným postihnutím OSN, Dohovor o právach osôb so zdravotným postihnutím, DOC, 160kB
- Convention on the Rights of Persons with Disabilities (CRPD)
- The 7 Principles of Universal Design
- Čerešňová, Z., Rollová, L.: Tvorba inkluzívneho vysokoškolského prostredia. 1. vydanie. Bratislava Nakladateľstvo STU 2015. 176 s. ISBN 978-80-227-4452-2
- Rollová, L., Samová, M., Čerešňová, Z., Končeková, D., Korček, P.: Identifikácia architektonických bariér v prostredí: Vysoké školy a študentské domovy. 1. vydanie. Bratislava Nakladateľstvo STU 2015. 137 s. ISBN 978-80-227-4451-5
Chapter 2: Training environment
2.1 Teaching in an accessible environment
2.1.1 Getting there
How do you make sure participants are able to reach the training?
2.1.2 Providing directions in an accessible manner
If you know your participants beforehand, you can of course ask for their preferences and then send exactly the information they need, in exactly the format they prefer. But if you don’t know them, you need to make sure that the information is accessible when it comes to both content and format.
2.1.3 Content
Try to describe how to get to the training venue without relying on visual cues. It is usually better to say, “take the second street to the right” than to say, “turn right at the big blue house”.
Remember to describe the surface; is this a road with asphalt, a sidewalk or a path with sand or gravel?
If possible, describe a way that supports audio and tactile orientation; walking alongside a building is usually easier than crossing an empty square.
Describe if there is reserved parking for community transport like taxis or busses near the building and how far away from the entrance these are.
2.1.4 Accessibility in the approach
Make sure that entrances and redirections are clearly marked with large, high contrast signs. Braille usually does not work very well outdoors, as users are not expecting objects to contain Braille. In some circumstances, good visibility on signs can be provided by to having the ordinary text being tactile (standing out from the background).
Try to place the signs leading up to the training venue at a distance where the next one is visible from where the user stands reading the first, and/or provide directions as to where the next sign is to be found, to facilitate.
Make sure stairs and other obstacles are marked with contrast marking.

2.1.5 In the building
In the entrance, provide clear marking on glass doors and other transparent items so that visually impaired users do not get hurt.
Walk through the building from the entrance to all the rooms where participants may need to go: the room where training is going to take place, to the toilets, the wardrobe, the kitchen or where coffee is serves etc.
Chose a path that avoids obstacles.
Remove loose objects and make sure there is something blocking the way under hanging cabinets and shelves, so that visually impaired persons don’t walk right into them.
Indicate routes and stairs with high contrast markings and large signs.
If the building is large, provide a large print (and if possible tactile) map or consider providing a companion to show the way. It may be enough to accompany the person once or twice, until the route is memorised.
2.2 Preparing the room
How do you make the room accessible for the visually impaired?
2.2.1 Furniture and placement
Make sure visually impaired participants get to choose where to sit, in the front is usually a good place. But as preferred light, angle to the board etc can be individual depending on specific impairment, it is better to let the individual decide. For example, macular conditions affect central vision, meaning participants may appear to be looking out of the window because they are using their peripheral vision.
When you stand in front of the class, avoid being in front of strong light, such as a window, as this will mean you are in a shadow and it gets hard to see your facial expression.
Whiteboards may be difficult to distinguish because they are located on white walls. The outline framing of whiteboards should be in a contrasting colour for visually impaired to be able to identify the board from the wall. Similarly, it is important to use chalk or markers that have a strong contrast with the board.
Be aware of the effect of lighting and reflections on white boards, both from natural light and lamps.
2.2.2 Lighting
General lighting should be bright and even, without causing glare. If the general lighting is hard to change, individual task lighting can be useful. Ensure all activity and internal areas are well lit at 250-300 lux and positioned to facilitate reading and other activities. Corridors and staircases require a minimum lighting of at least 100 lux. Shaded light fixtures such as compact florescent lights (CFL) or those using light-emitting diodes (LED) aimed downward are recommended.
2.2.3 Acoustics
Good acoustics are important for all participants, and of course especially for hearing impaired. As visually impaired participants can’t get the same information through their eyes as sighted users, audio is also key to this group.
Avoid background noise. Require participants who use screen readers or other audible assistive technology to use headphones, to avoid disturbing others.
In larger rooms, microphones, speakers and induction loops are necessary.
2.3 Let the user decide the format
If possible, provide information in black print, large print, braille, audio and digital formats. This way you are covering many different ways to perceive information.

2.3.1 Information on paper
For blind users, information on paper is not possible to read, but some/many users have the possibility to scan the paper and have their phone or computer read the information out loud to them. For this to work, the information must be produced in text, not an image of a text. In some countries, there are also manual services where the blind user can send a fax or similar to a specific service where a sighted person reads the content back to the user. In our country, you can ask the Blind and Partially Sighted Union to help you.
For most visually impaired users, information on paper can be read as long as the contrasts are good enough and the text size is large enough.
2.3.2 Color contrast
As visual impaired users may have individual difficulties with certain combinations of colors, it is hard to make everyone happy. Information on paper is therefore recommended to be provided in black and white.
2.3.3 Typography
Avoid italics and capital letters. These are less readable not only to visually impaired users but to all of us.
Leave reasonable space between lines of type. The exact space recommended depends online length and on the x-height of the font you are using. A rule of thumb can be to add 25 to 30 percent of the text point size between lines.
Line lengths should ideally be in the range of 50–65 characters. Some visually impaired people may prefer even shorter lines than this. Avoid splitting words at the ends of lines. Do not use justified text.
2.3.4 Fonts
The choice of font is less important than contrast, text size and spacing of characters. The favourite fonts of users are very individual and has to do not only with the visual ability but also habit. A “new” or unusual font is often perceived as harder (or slower) to read. Before the digital revolution of assistive technology, it was commonly thought that sans serif fonts (without “feet”: like Arial) where easier to read than serifed fonts (with “feet”: like Times New Roman). However, there is no valid research to support this when it comes to reading on a screen.
2.3.5 Text size
The size of a font is described in point size. Regular print is usually 10 or 12 point. Large print is generally 16-to-18-point size. Giant print is anything larger than this.
Remember that different types with the same ‘point size’ have different appearing sizes. The effective size of a typeface is actually related to the height of the lowercase x.
2.3.6 Digital information
If invitations to the training is sent out in digital format, it needs to be technically accessible so that users with assistive technology can read, navigate and use it no matter if they are using a screen reader, magnification or other kind of tools. You can learn more about how to make digital information accessible in the toolkit number two for workers in the public administration.
2.3.7 Text in digital format
Structure your text well, using content tables and headings. This will help it be read out loud and navigated by screen readers or other assistive technologies, maintaining the logical order embedded in the text.
For online texts, use the fonts specially designed for reading on a screen, like Verdana, Tahoma and Trebuchet MS. Always allow the user to change font and point size as needed in online texts.
Left align text instead of using block text (full justification). Use ‘Bullets and Numbering’ functions for lists. Add short summaries of content or chapter where possible.
Ensure that colours and the use of bold and italics are not your only method of conveying meaning. Ensure that all information conveyed with colour is also available without colour. Do not rely on colour alone to highlight different content.
Give data tables row and column headers and describe their content in a summary.
2.3.8 Low tech audio
There may be some, specifically elderly or people who have recently become visually impaired, who are not used to web-based information and/or assistive technology. These users may have the opportunity to use different kinds of audio, like Daisy players, CD or even tape recorders. It is also possible to record a message on an answering machine where the users can call in and get instructions.
2.4 Teaching strategies
Always address visually impaired participants with their name. This way they will know you are talking to them and not someone else. For example, when passing in a crowded hallway, say “Hi Sara, it’s John, how are you today?” Depending on the situation and how well you know the person, it may also be a good idea to gently touch the visually impaired person when addressing them.
When writing on the board, always read out loud what you are writing so visually impaired participants can follow along. Try to use positional and directional concepts like above/under, on top, behind/in front of, left/right etc. and use descriptive sentences like, “The ball is next to the door” instead of “The ball is over there.” When using words and phrases like “here,” “there,” “over here,” “over there,” and gestures that provide direction, (for example pointing to a location), make sure to also describe what you are pointing at so that visually impaired participants know what you mean.
2.5 Providing accessible information
How do you ensure that the technology used meets the needs of the visually impaired/the blind?
2.5.1 Technological equipment
Vision hardware allows participants with low vision or blindness to access written material in the classroom and on the internet. These tools include: Braille Writers for the creation of Braille documents; enlarged keyboards for their easily read keys; portable note-takers for zooming in on a chalkboard and recording a teacher; and various magnifiers. Low-tech solutions that can be used to enhance access to curriculum materials for participants with low vision include: Braille slate and stylus for writing Braille; Taylor frame for teaching maths; writing guide and regular Dictaphone for recording lessons; and models of different objects, tactile maps, globes, cardboard and thread for making tactile learning materials from scratch.
In this section, we are going to look at:
- Text-to speech technology (TTS)
- Magnification
- Braille
- Audio description

2.5.2 Text-to-speech technology (TTS)
Text-to-speech technology reads digital text aloud using a speech synthesizer. TTS is sometimes also called read aloud technology. It can be used on computers, tablets, smartphones and other assistive devices and can read all kinds of digital text aloud, including Word and Pages documents, pdfs, text messages, emails, and web pages. TTS has gained popularity over the years and now has a wide variety of uses in the digital world, such as for telephony, public announcement systems, smart assistants, mapping software, and for e-learning and educational contexts generally.
The voices used in TTS are computer generated and can be male, female, adult or children. They vary in quality, with some sounding more human than others, but due to rapid advances in recent years, TTS technology can now produce very natural-sounding speech, with variations in pronunciation and inflection. TTS can often be sped up or slowed down, and some TTS tools include optical character recognition (OCR), which means they can read text from images. Many can also highlight text as it is read aloud so that users can see and hear the content at the same time.
A screen reader is a type of assistive technology software used by some people with disabilities, including people who are blind or partially sighted, to use a computer, tablet or smartphone. Screen readers use TTS to read digital text aloud, and also provide the user with important information on headings, images, icons, links etc. Some screen readers also include screen magnification and can provide information in Braille, using a refreshable Braille display (see Toolkit 2 and 3 – parts on accessibility of information for more details).
2.5.2.1 Text-to-speech in training
TTS and screen readers can help learners and teachers as they provide access to digital text and navigation of computers, tablets and smartphones for visually impaired participants. There are different types of TTS, not all are developed for visually impaired.
The number of TTS tools available to use on Android and Apple devices and on PCs has rapidly increased in recent years. This section is intended as a handy guide to the most widely used TTS tools and screen readers. Some can be downloaded or are web based, and many devices and programmes now come with built-in TTS tools, so there is no need to purchase or download separately. There are even pen-shaped and other hand-held devices that can scan and read words.
| App | Description | Android/Windows/iOS etc |
|---|---|---|
| Speak Screen | Reads the content of the page on your screen out to you. Turn on Speak Screen and swipe down from the top of the screen with two fingers, or just tell Siri to Speak Screen, to have all the content on the page read back to you. | iOS |
| Speak Selection | Use Speak Selection to highlight the specific range of text you want to hear, in colours that you can customise. Then follow along as highlighted words, sentences or words within each sentence are read aloud. | iOS |
| Typing Feedback | When activated, each letter you type on the keyboard is spoken aloud. | iOS |
| VoiceOver | VoiceOver is a screen reader which allows people to use their iOS device without having to see the screen. With VoiceOver enabled on your device, just triple click the Home button to access. | iOS |
| Select to Speak | If you want spoken feedback only at certain times, you can turn on Select to Speak. Select items on your screen to hear them read or described aloud or point the camera at something in the real world. | Android |
| TalkBack | TalkBack is a screen reader which gives users spoken feedback and notifications. It allows people to use their Android device without having to look at the screen. To turn on TalkBack, press both volume keys for a few seconds. | Android |
| Google Assistant Read It | With Google Assistant, Android devices can read web articles aloud. To activate, when a web article is displayed on your browser, say “Hey Google, read it” or “Hey Google, read this page”. The browser will automatically scroll the page and highlight words as they are read aloud. | Android |
| Read Aloud | Listen to your Word documents with Read Aloud. To use, select Review > Read Aloud. Also listen to your emails with Read Aloud for Outlook. | Windows |
| Narrator | Narrator is the screen reader software built into Windows 10. It provides spoken feedback to describe the user’s actions as they navigate around the screen. To turn on Narrator, press the Windows logo key + Ctrl + Enter. | Windows |
| Read Out Loud | Read Out Loud is a TTS tool built into Adobe Reader. It reads text within a document window. To turn on Read Out Loud, go to View > Read Out Loud > Activate Read Out Loud. | Adobe |
| App | Description |
|---|---|
| Read Aloud for Chrome and Firefox | Read Aloud is a Chrome and Firefox extension that uses text-to-speech technology to convert webpage text to audio. |
| Immersive Reader | Immersive Reader reads out loud and highlights text simultaneously. It can be used with Word Online, OneNote Online, Outlook.com, Outlook on the web and the OneNote Windows 10 app. |
| Tool name | Description |
|---|---|
| NVDA | NonVisual Desktop Access is a popular, free, open-source screen reader for Windows, developed primarily for blind and partially sighted users who otherwise would not have access to the internet. It works with Office applications, and most web browsers and email clients. |
| JAWS | Job Access With Speech, is a popular paid screen reader, developed for computer users whose vision loss prevents them from seeing screen content or navigating with a mouse. JAWS provides speech and Braille output for the most popular computer applications. |
| @Voice Aloud Reader | Android app which reads aloud text from web pages, emails, Whatsapp messages, txt, pdf, Word and Open Office documents, etc. Free and paid versions. |
| Natural Reader | NaturalReader is a free text reader which can be used online or installed on your computer or devices. It operates in its own program window or as a floating toolbar. It can read text from Word documents, pdfs, emails, and most document formats. Also offers a Chrome extension. Free and paid versions. |
| Voice Dream Reader | Voice Dream Reader is an accessible reading tool for mobile and tablet devices. With advanced text-to-speech and a highly configurable screen layout, it can be tailored to suit every reading style from completely auditory to completely visual, plus synchronized combination of both. Paid. |
| T2S: Text to Voice | An Android app that uses Google's own text-to-speech software. You can open or import a text file to be read and save the output as an MP3 file. It also has a feature called Type Speak, which will provide audio for text as you speak, which could be especially helpful for people with communication problems. It's free to use but does contain ads and offers in-app purchases. |
Encourage participants to find the voices they prefer and to try out using different voices for different texts to maintain engagement. Advise participants to find the right speed for them and to avoid listening to the text too fast. Visual impaired participants who need instruction in using screen readers will benefit from specialist training and can benefit from contacting a disabled persons organisation for advice.
2.5.3 Magnification
A screen magnifier is a feature, tool or application software that increases the size of text and graphics on the screen of a device or computer. There are many magnification devices which are used primarily by visually impaired persons, including hand-held magnifying glasses and video magnifiers, but this section focuses on screen magnification apps, sometimes also called screen enlargement software.
Most people will find that the most effective way to use screen magnification on a computer is to set the screen to full screen mode. Some magnifiers enlarge the pages or content displayed on the device, and others use your device’s camera as a magnifying glass to help the user read printed text or identify small items. Some users may prefer to use a screen magnifier alone without having text read aloud, while others may find it more beneficial to use screen magnification in combination with a screen reader.
2.5.3.1 Adjusting display settings on devices and web browsers
You may be able to adjust the default display settings on your device, to enlarge text and/or images, which will apply to all of your applications. However, this is not always possible on all devices. You can also modify the settings of web browsers to increase text and image size, either temporarily or by default. You can also change colours and fonts, such as for a higher contrast.
2.5.3.2 Magnification in training
Screen magnification can help in training situations as it is useful for participants who are not able to view content well on a screen without enhancements. Magnification can be tailored to the requirements of each participants, by adjusting settings such as colour, mouse pointer size and magnification level.
Magnification also makes mainstream applications more accessible, as it enables participants to access and engage with the same activities as others. It also helps learners manage eye fatigue, use good posture and view digital content at a good viewing distance.
Magnification can help learners not lose their place when reading, by emphasising an area of the screen with shading and colour. It can make text more readable by smoothing the edges of enlarged letters, so they do not appear blocky and hard to read. Magnification can reduce glare by inverting the colours on the screen, which can be helpful for participants with macular degeneration. Magnification can make the cursor easier to find by enlarging the mouse pointer or adding a circle around it.
Beginners in using screen magnification should start out by using it for short periods of time, such as in 15-minute sessions, as it can be disorientating at first. Learning shortcuts / keyboard commands can help learners navigate and orient themselves, especially at high levels of magnification, and particularly those that are most relevant to them.
It is useful for learners to be familiar with adjusting the display settings of a device, so they can make adjustments when using different devices in labs or different educational settings.
2.5.3.3 Magnification tools
Apple, Android and Windows devices now come with built-in screen magnification tools, so there is no need to purchase or download. They can be enabled when you first turn on an Apple, Android or Windows device, or at any time. Third party screen magnifiers, which can be downloaded separately, may offer a wider range of features, such as being able to use different magnification levels, change the colour of the background and foreground, make adjustments to the mouse pointer or cursor, or speech may be included. Some third-party applications offer 30 day or 60-day free trials.
With some screen magnification tools, you can use the mouse or keyboard shortcuts to position the cursor where you want to enlarge the text or image, while some allow you to pre-set speed for the cursor to move automatically across and down the page.
| App | Description | Android/Windows/iOS etc |
|---|---|---|
| Zoom | You can use Zoom to magnify the entire screen (Full Screen Zoom) or you can magnify only part of the screen with a resizable lens (Window Zoom). You can use Zoom together with the iOS built-in screen reader VoiceOver (see table Built-in TTS tools / screen readers) | iOS |
| Magnification | Once activated, you can triple-tap the screen to enter full-screen magnification and you can still interact with the device while zoomed in. | Android |
| Magnifier | Magnifier makes part or all of your screen bigger so you can see words and images better. | Windows |
| Magnifier | Works like a digital magnifying glass. It uses the camera on your iPad to increase the size of anything you point it at, so you can see the details more clearly. Use the flash to light the object, adjust filters to help you differentiate colours, or snap a photo to get a static closeup. | iOS |
| App | Description | Android/Windows/iOS etc |
|---|---|---|
| ZoomText Magnifier | An advanced screen magnification programme that enlarges and enhances everything on your computer screen, making your computer easier to see and use. ZoomText also offers magnification software integrated with a reader or JAWS screen reader. | Windows |
| SuperNova Magnifier | Advanced screen magnification software which can enlarge and enhance everything on screen. You can choose high-contrast colours, large mouse pointers and highlights to help you track and navigate each page. | Windows |
| Magnifying Glass with Light | It has feature of Light Level Control and also has feature of image Capture. This app will provide you facility of Auto-Focus Lock and it is universal App for both iPhone and iPad. You can pinch to Zoom In/Out and it support Both Portrait and Landscape Orientation. This app has auto turn on built-in light in low light condition feature when start-up and you can shake to hide/show all control buttons. It also supports Front Camera and you can use Full Screen Interface. | iOS |
| Magnifying glass + Flashlight | The magnified image has detailed, but not blurry picture due to its auto focus feature. The app lets you freeze the screen and read comfortably. If required, you can also use a flashlight of your smartphone to lighten a magnified image. You can also save the pictures you’ve taken and watch them later. | iOS |
| Magnifier + Flashlight | This app uses your phone’s camera to magnify text, has light and invert mode features and a capture function. | Android |
| SuperVision+ Magnifier | It is easy to activate stabilization. This app has option to not only stabilize vertically, but also allowing horizontal reading movement. It has large and highly visible buttons, and you can maximize screen by double tapping to hide buttons and also can freeze images at high resolution for examining details. This app has built-in flashlight support and allow focus locking. | iOS |

2.5.4 Braille
Braille can be written and read through a computer, using electronic Braille displays, which are also known as digital, paperless, soft or refreshable Braille displays. Braille displays allow the user to enter data and control their computer, read digital documents, web pages and email using Braille. Braille displays work in combination with screen readers, which send information to the Braille display. They are often compatible with magnification software also. They are placed underneath a computer keyboard. They enable the user to read what's on the computer screen by touch in Braille.
2.5.4.1 Braille in training
Braille provides an active reading and writing method for people who cannot access print. Reading braille is active, whereas listening to audio is passive. Therefore, Braille enhances literacy, aiding learning of punctuation, grammar and spelling, and boosts enjoyment of reading.
Braille provides a system for labelling items, which boosts independence and self-esteem. It aids independent living and employability, provides access to playing card games and board games with friends, family and in educational settings.
Braille boosts organisational skills, as enables learners to keep a diary, write lists and write greetings cards. It aids financial independence and privacy, as many banks and other business provide statements and bills in Braille. It is useful for proofreading, working on the web or for people who work a lot on the telephone.
2.5.4.2 Braille tools
Refreshable Braille displays can be connected to iOS, Android, Windows and Kindle devices via USB connection or Bluetooth. Notetakers are small portable computers designed for use by visually impaired users. They can have a standard or Braille keyboard, with digital information, such as from web pages or email, displayed in Braille and/or read aloud. They can be connected to a computer, printer or Braille embosser. There are apps that can be used with PCs, tablets and smartphones to take Braille notes or learn Braille.
| Tool name | Description |
|---|---|
| Orbit Reader 20 | Portable refreshable Braille display, with 20 refreshable eight-dot Braille cells. It offers reading books via SD card, simple notetaking, Bluetooth and USB connectivity. Use Bluetooth to connect to Apple, Android or Kindle devices and access books through reading apps such as Kindle, Adobe Digital Editions or iBooks. The translation into Braille is performed by your device's screen reader to give you a quick Braille output on your Orbit Reader 20. |
| Focus 80 Refreshable Braille Display | Refreshable Braille display, with 80 refreshable eight-dot braille cells. Up to five Bluetooth connections to connect to iOS and Android devices such as smartphones, iPads, and tablets. You can also use the Perkins-style keyboard for Braille text input to control your computer. Use with JAWS for combined speech and Braille access. |
| BrailleNote Touch 32 Plus – Braille note taker/tablet | Braille notetaker, powered by Android 8.1 Oreo. Optomised Chrome web browsing. Provided with EasyReader Plus, a new reading app tailored for BrailleNoteTouch. Filled with educational tools and fully supports standard keyboards. Access to Google Assistant. Team collaboration by sharing documents using Google Drive or other cloud services. |
| BrailleBack | With BrailleBack, you can connect a refreshable braille display to your Android device via Bluetooth. BrailleBack works with the TalkBack screen reader to provide a combined speech and braille experience. |
| iBrailler Notes | Offers an easy way for iPad users to type Braille notes and perform basic word processing on a touchscreen (for iOS only). |
| Braille Tutor | App for learning Unified English Braille. Works on iPad using onscreen keys or home keys on a Bluetooth keyboard. It is self-voiced, but also works with iOS accessibility. Uses sounds and text-to-speech to support vision-impaired learners. Using a Bluetooth keyboard also gives the user a feel of the keys. |

2.5.5 Audio description
When using video as a pedagogical tool, it is important to provide audio description. Audio description is a way to describe visual details that cannot be understood from the soundtrack alone, sometimes called voice-over narration. It is usually placed during natural pauses in the audio of a video or theatre play and sometimes during dialogue if deemed necessary. Its purpose is to provide information on key visual elements, actions, etc. in audio-visual media. The audio description provides information about what happens on screen “the burglar sneaks in behind the hero and hides behind the door”, screen changes “when she looks aout of the window, the rainy clouds have disappeared, and the sky is suddenly clear and blue again”.
The same methodology has to be used for any meaningful visual content shown, no matter if it is on a white board, a power point or something else.
Always describe what you are showing or doing and read text out loud.
If visual impaired participants are not using digital support, it may be a good idea to record the session for the participant to repeat afterwards.
Audio description can help learners and teachers as it provides access to visual information in videos to learners with sight loss. Audio description can increase learners’ awareness of sight loss and it can also be used to motivate learners to engage in close reading of visual material and think critically about interpreting visual information. Audio description helps language development as listening is a key step in learning language. It may assist in the acquisition of language vocabulary and reading skills via an interchange between the use of voice and the relevant sounds and images on screen, to create meaning. Audio description provides a more comprehensive and global picture of visual media and increases understanding and thereby facilitates comprehension.
| App | Description | iOS / Android | Free / Payment |
|---|---|---|---|
| Greta | This app enables people with sight loss to experience fully accessible cinema. | iOS | Free |
| Earcatch iOS & Earcatch Android | This app offers audio description for films and series. | iOS & Android | Free |
| MovieReading iOS & MovieReading Android | This app allows smartphones or tablets to display perfectly synchronized subtitles or audio description of any movie, in any theatre, with the simple push of a button. | iOS & Android | Free |
2.5.5.1 Writing audio descriptions
Describe the visual elements that are important to understand what the video is communicating. Don’t describe every detail or things that are apparent from the audio.
Describe objectively, without interpretation or personal views. Always write descriptions in present tense and third-person narrative style.
2.5.5.2 Recording audio descriptions
Use a voice, style, and delivery that is distinguishable from other voices used in the video. Use a neutral voice that does not convey emotions. Record the descriptions at the same time as the visual content, or right before the visual content, never after the visual content.
2.5.5.3 Using audio description in training contexts
Invite a group of sighted participants to describe an image that others cannot see. Ask them to point out the aspects of the image that draw their attention most and to discuss how the image makes them feel. The visually impaired participants ask questions, probe for further details and discuss the contradictions in the different descriptions. Sighted participants who couldn’t see the image can look at it and comment on the differences between what they visualised and what they now see, on the most helpful and misleading aspects of the descriptions, etc.
Let participants make lists of nouns and adjectives to describe an image, including the objects in it and/or their emotional responses to it. Then compare their lists and discuss choices, noting and discussing which aspects are emphasised or ignored. The discussion can be led by visually impaired participants. Then all participants create paragraphs in groups, describing the images using the nouns and adjectives, which could be a narrative or a journalistic / scientific piece of writing.
2.6 Participation online
How do you ensure that the visually impaired/the blind can participate in training online?
A learning management system (LMS) is a software application for the administration, documentation, tracking, reporting, automation and delivery of educational courses, training programs, or learning and development programs. The learning management system concept emerged directly from e-Learning. These are the accessibility features of the most commonly used LMS:
2.7 Accessible digital formats
How do you ensure that digital formats work for the visually impaired/the blind?
Productivity applications are a category of application programs that help users produce things such as documents, databases, graphs, worksheets and presentations. This section includes the accessibility features of the most common productivity application in Microsoft Office (Word, PowerPoint and Excel).
The main features of Microsoft software include tools for people who are blind, colour blind, or have low vision: Microsoft accessibility for visual impaired
These are useful links for accessibility tools in Windows:
- Windows 10 Accessibility Tools
- Accessibility support for Word (Windows, macOS, iOS, Android, Windows 10 app and Web)
- Accessibility support for PowerPoint (Windows, macOS, iOS, Android, Windows 10 app and Web)
- Accessibility support for Excel (Windows, macOS, iOS, Android, Windows 10 app and Web)
2.8 Accessible documents
These are the steps to use the accessibility checkers in Word, PowerPoint, Excel and PDF.
2.8.1 Accessibility checker in Word
- Select File > Info.
- Select the “Check for Issues button” in the “Inspect Document” area.
- Click the “Check Accessibility” command to launch the task pane.
- A list of “Errors” and/or “Warnings” may appear.
2.8.2 Accessibility checker in PowerPoint
- Select File > Info.
- Select the “Check for Issues button” and choose “Check Accessibility”.
- In the Check for Issues drop-down menu, select Check for Issues.
- Select the “Review tab”, then choose “Check Accessibility”.
2.8.3 Accessibility checker in Excel
- Select File > Info.
- Select the Check for Issues button.
- In the Check for Issues drop-down menu, select Check for Issues.
- The Accessibility Checker task pane appears next to your content and shows the inspection results.
2.8.4 Accessibility checker in PDF (Acrobat Reader)
- Open the document.
- Add the Accessibility Tool to your Toolbar: Click on the Tools Tab > Click the Add button below the Accessibility Tool.
- Return to Document View: Click on the Document Tab.
- Open the Accessibility Toolbar: Click on the Accessibility Tool in the Toolbar on the right side of the window.
- Run a Full Check of the document: Click on Full Check in the Accessibility Toolbar on the right side of the window > Click on Start Checking to run the Accessibility Checker.
- View the results:
- The Accessibility Checker panel will be opened on the left side of the window.
- Click on each category to expand that section:
- A green checkmark indicates that the test was passed.
- A red X indicates that the test was failed.
- A blue question mark indicates that the test must be done manually.
- Some items can be fixed automatically by Acrobat, and some will need to be fixed manually.
- Right-click on each item to see if they can be automatically fixed.
- If the item cannot be fixed automatically, click on Explain to open the item's section in the Acrobat User Guide.
- You will find a description of the reported issue and directions on how to fix it.
2.8.5 Accessibility checker in PDF (Adobe Pro DC)
- Start by selecting Accessibility Tools.
- Select Full Check command from the Accessibility Tools panel to open the Accessibility Checker Options dialogue, select the Report Options to save the results as an HTML file or attach the report to the document.
- Use the default “All Pages” to check all pages or select a page range to check on individual sections of a document.
- Select a Category of Document, Page Content, Forms, Tables and Lists, or Alternate Text and Headings to modify the accessibility Checking Options. By default, everything but “tables must have a summary” is checked.
- Select the Start Checking button to begin the full check.
2.9 Accessible handouts
How do you ensure that handouts work for the visually impaired/the blind? Some of the ways we described in the text above. In this part we repeat them in the context of the handouts.
- Large print
- Braille
- Accessible digital versions
2.9.1 Tactile graphics
People with a vision impairment are finding tactile graphics extremely valuable and, in some cases, vital for successful study, work and leisure. While people with a vision impairment are routinely provided with text transcribed into Braille, audio or large print, the pictures, diagrams and maps which accompany text are often omitted or only very briefly described.
Visual graphics can effectively be converted into tactile graphics, even for the highly graphical information contained in maps and scientific material. This is not simply a matter of taking a visual image and making some kind of tactile photocopy – the tactile is a considerably less sensitive sense than the visual.
Visual graphics need to be re-designed by experts, in a variety of formats such as vacuum-formed (thermoform), swell paper (microcapsule paper) and embossed (such as that produced on a Braille printer). They can also be accompanied by labels and descriptions in Braille or audio format.

2.9.2 Tactile graphics are useful when:
- the user is print-impaired but has some tactual ability
- a concept not easily described in words
- a real object is unavailable for touching
- the shape, form or pattern is significant
- it is necessary to illustrate scale and explain maps, technology or biological relationships
- a one-time reference or reminder is needed
- the educational experience can be enhanced.
Tactile graphics are not, however, exact replicas of the original, nor are they good for fine detail and representing very large graphics. They should not be used without training and support materials.
2.9.3 Audio books (e-books)

An audio book is a recording of a book being read aloud, which as such can be of great benefit for visually impaired users and many others. For visually impaired, the audio book as such is more accessible than print. But for the format of audio books to be completely accessible, it should be supplemented with audio descriptions of photographs, illustrations and other graphic content, possible to navigate through without visual means and so on. The most common formats used for accessible audio books are DAISY and EPUB 3.
Digital accessible information system (DAISY) is designed to be a complete audio substitute for print material and is specifically designed for use by people with "print disabilities", including blindness, low vision, and dyslexia. The DAISY format has advanced features in addition to those of a traditional audio book. Users can search, place bookmarks, precisely navigate line by line, and regulate the speaking speed without distortion. DAISY also provides audio described tables and references, which allows visually impaired listeners to navigate complex content.
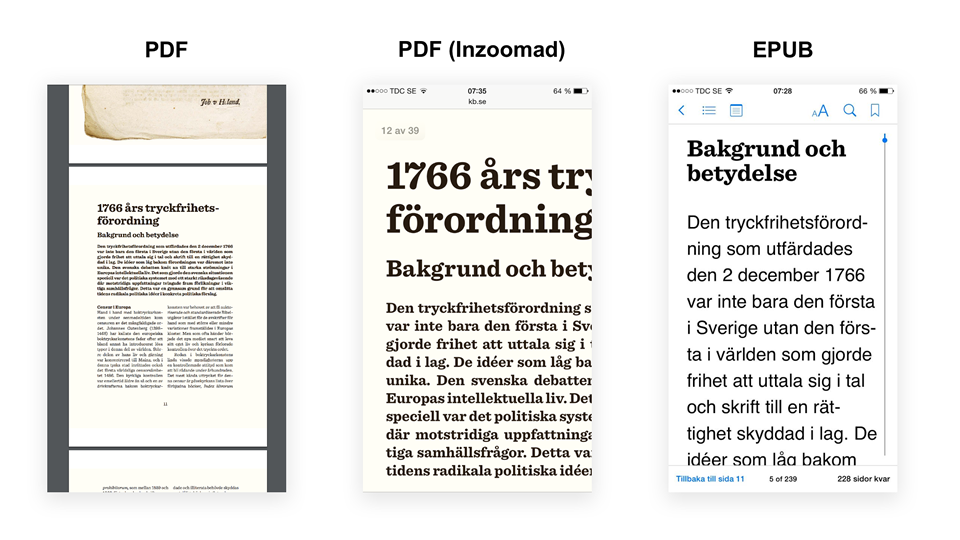
Electronic publication (EPUB) is an e-book file format that is supported by many e-readers. Epub compatible software is available for most smartphones, tablets, and computers. The format enables overflowing text, which means that the text can be optimized for the current screen size. The fact that the text is re-flowable also means that the user in many e-browsers can influence the font, font size, line spacing and background color and contrast.
The difference between how text is presented in PDF, zoomed PDF and EPUB is demonstrated in the image below:
2.10 Summary
When training people with visual impairments, it is important to:
- Provide accessible instructions on how to get to the venue
- Make sure the classroom is accessible
- Pay attention to individual user needs
- Make sure to provide the technical tools and solutions needed for the students
- Audio describe visual elements
- Make sure all digital content is accessible
Chapter 3: Empathy Exercises
Author: Susanna Laurin, Funka, Sweden
3.1 Introduction
Why empathy exercises and how does it work?
Accessibility can easily become very theoretical, focusing on standards, measurements and regulations. But for the accessibility work to be successful, you need to understand not only the rules, but rather the user perspective. Please remember that both standards and regulations are providing minimum requirements, for something to be perceived as accessible for people with visual impairment, you will often need to go beyond the mere minimum.
By getting to understand just a little bit of how it feels to orient yourself blindfolded, you can get a better understanding of why the rules are in place and how to comply with them. Of course, making easy exercises in a safe environment during a limited time, guided by experts can never be compared to living with a visual impairment. But research shows that empathy exercises does raise awareness and often starts a process of more inclusive approach to finding real solutions – not only complying to laws and recommendations.
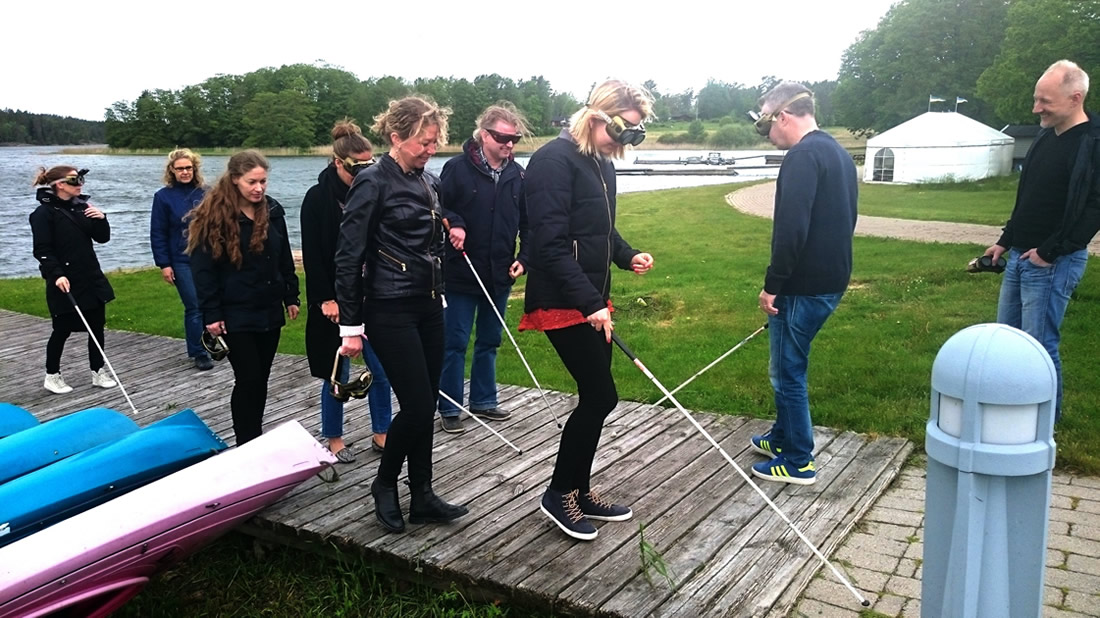
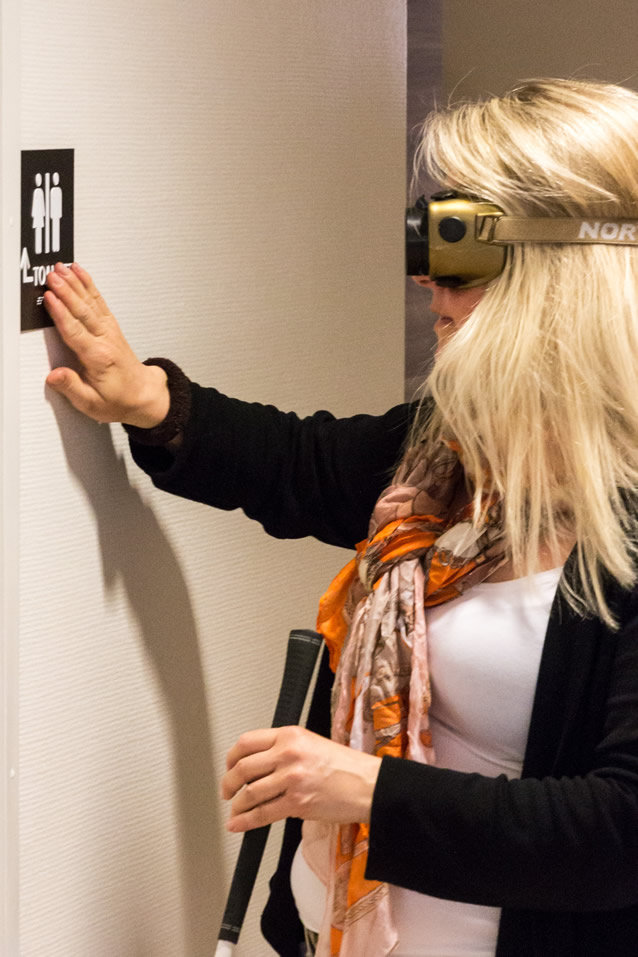
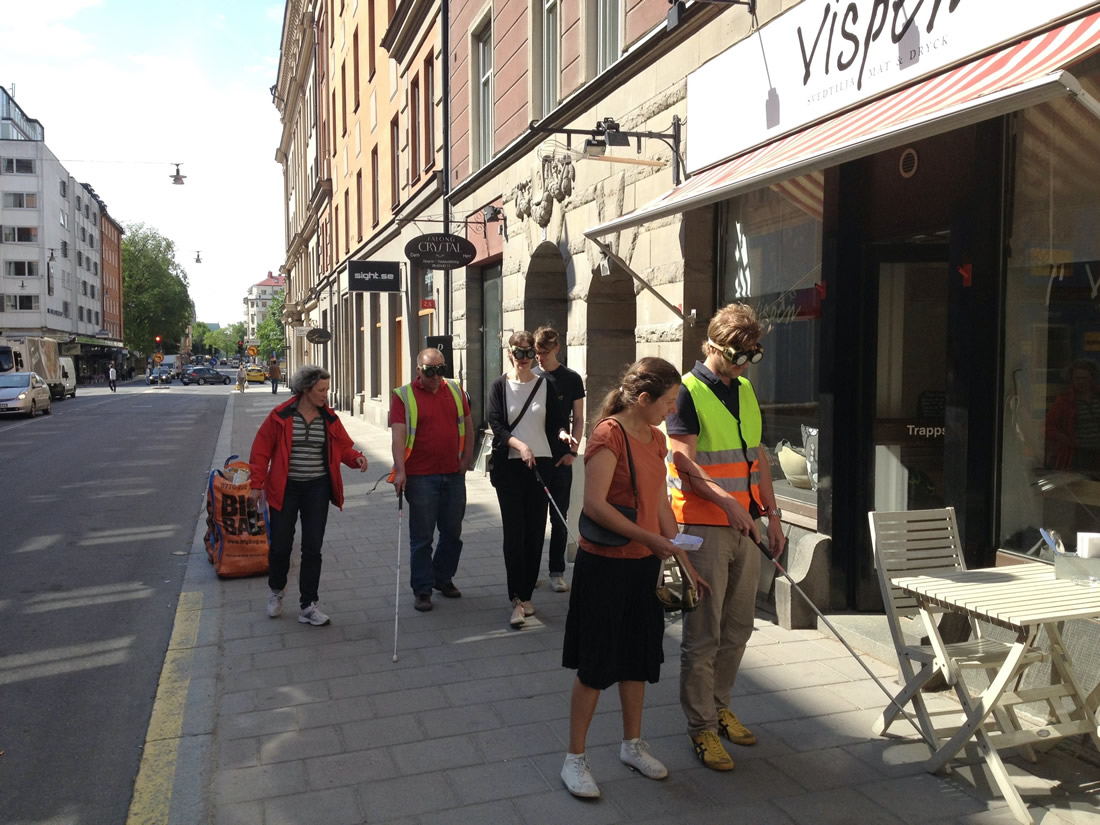
The basic idea of empathy exercises is simple: participants are blindfolded (see below) and asked to perform certain tasks, guided by experienced visually impaired supervisors. Participants get the chance to try out different situations that are challenging with our visual ques, by themselves, thereby experiencing firsthand how difficult (and scary!) it can be to orient and move around blind folded.
3.2 Set up and performance
The set-up of empathy exercises often look like this:
- General introduction by trainer in the training room: what are we about to do and why?
- Division in smaller groups or pairs to perform the exercises – each group is assigned a supervisor
- Specific instructions to each group by its supervisor
- Trying out the equipment used
- The groups move to the location of the exercise, carrying their equipment
- Tour and tasks are performed in groups
- Reassembly in the training room for de-brief (see chapter 3.8)
The empathy exercises are often combined with theoretical training sessions on accessibility, regulations etc. Our recommendation is to start off with the theoretical part and finish the training with the empathy exercises, to make sure the supervisors can point to specific parts of the regulations or standards when doing the tour.
3.3 Preparation
How to prepare the groups
Although most people react in the same way: being very careful and taking baby steps when they can’t see where they are going, please remember that participants may try to be brave and careless, as they may not understand the dangers. Also, there is a risk that some individuals may panic when blind folded. Therefore, it is extremely important to provide the possibility to choose the level of sight loss and always have a supervisor close by. Of course, anyone can stop the exercise at any time and just look at what their fellow participants are doing instead – which can also be an eye opener.
The supervisors should be visually impaired themselves, as no one is a better expert explaining strategies and giving cues than the actual persons who live with the disability. This is also essential to make sure the exercise is based on the principle of “nothing about us without us”. Depending on the supervisors’ knowledge of the area where the exercises are performed, you may want to complement the group with sighted persons as well, for safety.
The ideal set up is to have two participants for each supervisor, so they can support each other and share experiences. It is important to divide the exercise in small parts, as it can become very tiring for the participants.
3.4 Equipment
Impairment glasses and white canes
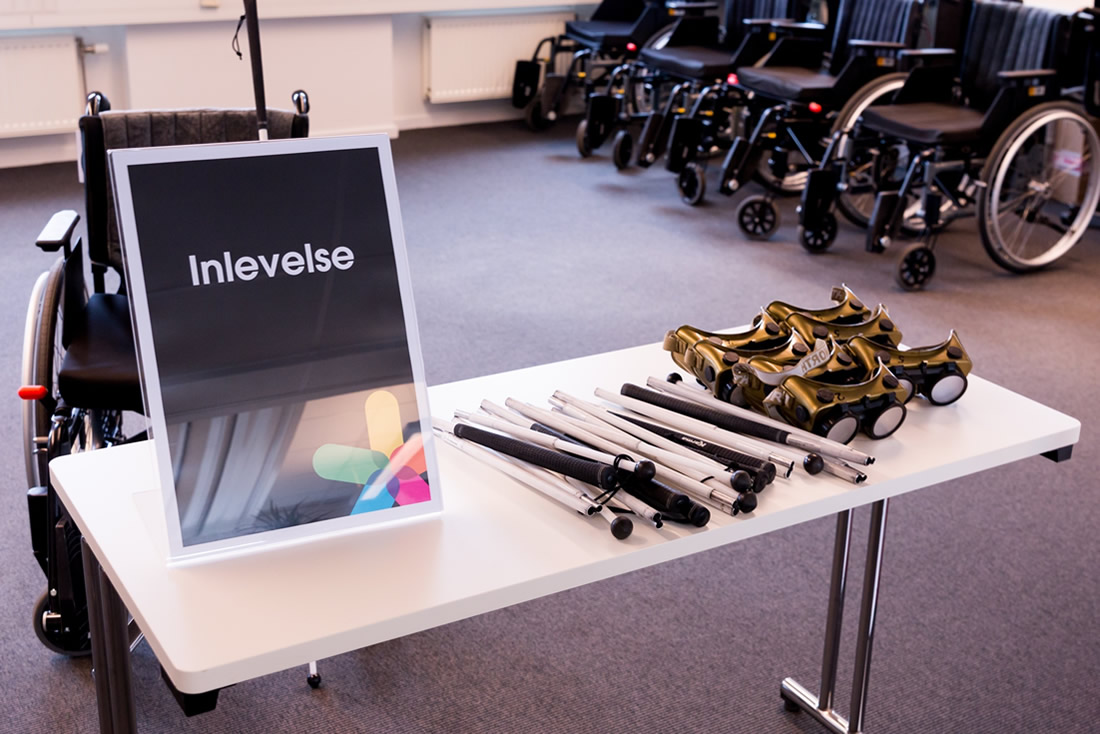
The equipment used in empathy exercises are impairment glasses and white canes.
The impairment glasses are a pair of glasses simulating sight loss. In these glasses, you can choose to see anything from a certain % to nothing at all. This flexibility is important, as not all participants will feel comfortable being totally blind folded. Performing the tasks with simulated low vision is also very efficient, so let the participants decide for themselves what level of sight loss they would like to try. The impairment glasses can be used on top of ordinary glasses.
The white cane is what many blind persons use to orient themselves in the environment. It takes training to become an efficient cane user, but with a short introduction, most participants will get the idea. If they use the cane a bit odd, that is fine, remember it is just an exercise to achieve awareness.
Impairment glasses and white canes can be ordered from zdravotnícke potreby and Tyflocomp.
3.5 Make the tour
Planning and walking the route is essential
Depending on the location of the exercise, weather conditions, how long time you have to perform the exercises and the size and age of the group, you need to plan a good route on beforehand.
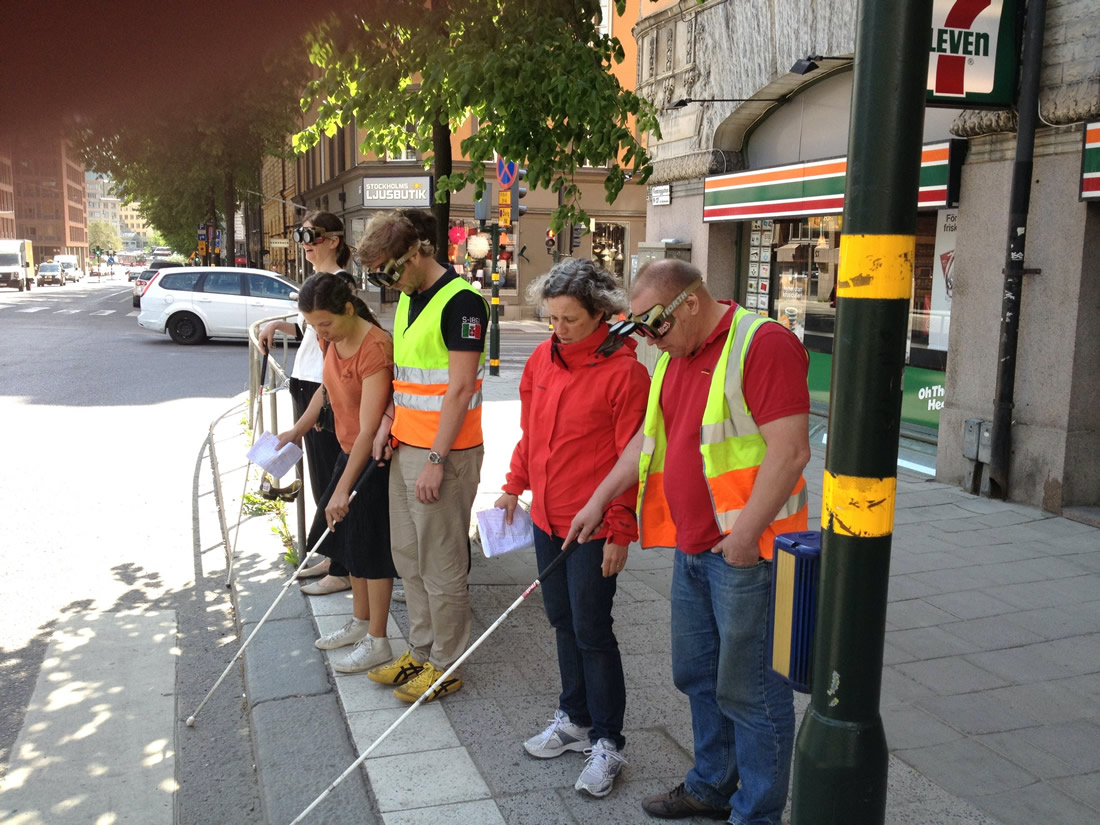
The most efficient way to achieve awareness of the challenges for visually impaired is to move around outdoors, instructing participants to try to find their way to a specific place, cross streets and, time permitting, using local transportation.
If outdoor training is not possible, orientation indoors can also be performed, for example walking in long corridors (you can prepare obstacles standing or hanging in the way and make sure other people keep moving around in the corridor during the training to make it more “live”), using stairs and elevators and finding a specific room.
When setting up the route, make sure plan together with the supervisors what strategies and learning elements should be covered in each part, tactile information, audio information etc.
3.6 Groups and pairs
Be careful when dividing people into groups
Empathy exercises can of course be made in many ways and you need to be flexible depending on the size of the groups and overall conditions. It has proven successful to divide participants in pairs with a supervisor, making a group of three, but the group can be larger if needed. For safety reasons, only one person at a time in the pair or group shall be blindfolded, the others support and learn from what is happening. The larger the group, the more difficult it is to ensure all group members listen to instructions and focus.
If possible, try to group participants so they are not performing the exercise together with their closest colleagues or friends. This usually means they pay closer attention to what is actually happening, without bias based on expectations. As always, it is desirable to have mixed groups when it comes to gender, age and previous experiences.
3.7 Safety
Take your time to give detailed instructions to the supervisors
As previously stated, participants may react in unexpected ways during empathy exercises. Of course, safety is the most important aspect of the instructions, making sure that supervisors are staying close to participants and give them clear instructions during the whole time of the exercise.
It is a good idea to pilot the route and instructions with the supervisors, or as a minimum walk through a prototype of a route as a starting point. Staying calm, pedagogical and instructive doesn’t come natural to every one of us, so a little bit of training is always recommended.
3.8 De-brief and lessons learned
A semi-curated discussion, leaving room for feelings
No matter how you set up and perform your empathy exercises, do make sure that the whole group get a chance to reassembly directly afterwards. This is an important part of the training, as it will allow for a semi-curated discussion among participants, so they learn from each other’s experiences.
During the de-brief, the trainer and supervisors can relate what the participants describe from the tour to specific parts of the regulations and standards, thus pointing out the gap between minimum requirements and actual perceived accessibility.
The supervisors can also describe specific incidents or share questions from his or her group with the plenary.
The open discussion is also a good time for any misconceptions can also be sorted out, as can a general understanding of individual strategies and coping with sight loss be discussed. It is important to underline that the exercise doesn’t show what it is like to have a visual impairment, it is just an eye opener.
3.9 Summary
- Empathy exercises are a good way to raise awareness
- Safety is crucial
- Always work closely together with visually impaired when planning and performing the exercises
- A combination of theory and exercise is recommended
Chapter 4: Facilitation
Author: Eva Metonová, Slovak Blind and Partially Sighted Union, Slovakia
4.1 What should a presentation look like if the audience is not able to see it?
These days every lecturer has their topics and teaching material processed into awe-inspiring presentations. Thus, a situation when the presentation is meaningless to some members of the audience can be new and challenging.
Besides, there has been a shift from presentations that are a direct transcript of what the presenter is saying to a new type of presentation, where images become an additional communication layer. Such presentations are a visual metaphor or a graphic summary of the presenter's main points and are used to stimulate other parts of the brain during listening to make the content easier to remember.
Presentations are used not only in face to face training courses but also in courses in the virtual space. They are used by lecturers who teach directly through digital platforms, but they may also be designed to work without direct lecturer support. Creating good presentations is even more critical in situations where the lecturer is not present.
In a nutshell, a presentation is an excellent aid for lecturers who want to leave a lasting impression in the participant's memory. The rationale for this comes from the knowledge that we perceive 83% of information around us by sight and 11% by hearing1). (Rosenblum, L. D., 2010). This means that engaging eyesight to support spoken word always enhances the outcome of the lecturer’s work. Did you know that we remember 50% of information if we hear and see it at the same time? If we only listen, we only remember 20% of the presented information (Magnesen, V. A., 1983)2). After three months, we still remember about 32% of information if it was presented to us by both word and image. However, if the information was only heard, only 10% of it would be remembered (Whitmore, J., 2017)3). The combination of multi-channel stimulation is thus highly desirable to achieve optimal memory results.
However, what can a lecturer do in a situation where the critical 83% of visual stimuli is lost to one of the participants due to visual impairment? How can the lecturer adapt their teaching method when using a standard informative presentation? And what about a presentation which uses visual short cuts? How to make visual information more interactive?
The key issue to be addressed is the correct seating of a visually impaired person amongst the students. As the functional consequences of visual impairment are very diverse, do not hesitate to ask a visually impaired person directly which seat they would prefer to get the most out of the training. Visually impaired people currently use a variety of aids and technologies to process their notes (laptops, electronic magnifiers, telescopes, voice recorders, etc.). Due to the limited battery capacity of electronic devices, it is recommended that they have a seat near an electrical outlet. Photophobic people (photophobia is a common functional consequence of several diagnoses of partial sightedness or legal blindness) should sit as close as possible to the screen or the projection wall, but far enough from direct sunlight, which causes glare and reflections. Any participant taking notes on the computer should sit so that the daylight falls from the side, and not from the back or directly into the face. If there are blinds in the lecture room, it is advisable to adjust them so that the sunlight penetrating the room is equally distributed.
If you want participants to follow your presentation and be able to take notes at the same time, you should distribute your teaching material in advance. It is optimal for a visually impaired participant to get acquainted with the training material in advance. If you know that a visually impaired participant will take part in your training, allow them to choose a format in which they want to receive the teaching material from you. It will be up to them whether they choose a digital format or an adaptation of the hard copy. Digital documents must be submitted in an accessible format5). For example, you can post them on the web page, if you have one, and make them available for download, send them to participants by e-mail or upload them on a USB key on the day of the training. Partially sighted people may benefit from a scaled-up version of the documents, as this will significantly simplify and speed up their reading. Such participants can define the size and contrast themselves, as these parameters depend on the degree of their visual impairment. Some blind people would welcome receiving educational materials in Braille (ideal for foreign languages, numerical materials, etc.). Local organisations or libraries for the blind and partially sighted will help you convert your materials into Braille.
When preparing an application for your educational activity, include a question related to the need to adapt the training materials. It might, for example, contain the following: "Hard copies of the training material will be distributed to participants at the start of the training. Would you welcome the training material in another format? If so, please define the format and specify any other requirements you might have."
If you cannot support your educational activity by supplying materials in advance, or if you have a different training concept, it is crucial that you adequately describe all visual information. What do we mean by adequately? First of all, do not change your vocabulary and do not avoid words that you commonly use (such as "here you can see", "please notice" or "take a closer look"). If you are showing graphs and pictures, you need to introduce them out loud and describe them briefly. Images can be informative or illustrative (symbolic). Both types of images need to be described, referred to, or commented on factually. In presentation, we often summarise topics in bullet points, which can be visually very clear, but may be confusing to a visually impaired person, (e.g. due to an overly detailed explanation by the lecturer). Ideally, the bullet points in your presentation, need to be read out and emphasised orally at the end of the presentation. However, it is necessary to maintain an appropriate degree of descriptiveness so that you do not overly focus on explaining visual information. It is certainly not right to comment on this particular information being intended for a specific visually impaired course attendee.
An activity based on a collaborative creative process, which you subsequently record in writing, may not be understandable to a visually impaired person. This is primarily because a lot of information that is communicated by various people in group activities – by a different voice, a different articulation or a different pace of speech – is visually supplemented by sighted people. A visually impaired person may not be able to correctly or timely pick up on individual participants’ statements. It is, therefore, necessary for you to continually describe the debate and comment upon any changes you are making to the presentation. Don't hesitate to describe who raised their hand, how participants reacted to someone's statement or to explain why the participants laughed (if it is not apparent from the spoken word). Non-verbal communication is not legible for visually impaired people. It is also necessary to describe the course of the discussion and the notes you are taking down. At the end of the presentation briefly summarise everything once again.
An important rule when conducting a discussion is to ask all participants who join the debate to state their first name before their contribution. A visually impaired person can thus connect people with their voices. Thanks to this information, they already know who they are talking to during informal chats, and can continue the discussion if they choose to.
It is necessary to address a visually impaired person before each contact so that they know that we want to talk to them. This is especially important in a group activity, when they may not be able to correctly identify that the speaker wants to make contact with them or when a question is asked directly of them. It is complicated and exhausting for a visually impaired person to continually follow a general conversation and make judgements about what relates to them and what is meant for someone else in the group. 6)
If you are considering using help to record statements, contributions or summaries during the discussion, most visually impaired people have excellent typing skills. Do not hesitate to use this opportunity to involve them actively.3) In situations when you want to include as many participants as possible in the discussion, visual contact will usually be sufficient as an invitation to participate. However, a visually impaired participant needs to be addressed directly by name to let them know that you are inviting them to be involved in the discussion.
If there is a video in your presentation, it is a good idea to talk about the topic of the video and the thought behind it before it starts. When the video ends, describe the story and repeat the main statements made. The audio quality of the videos will be different from your accompanying spoken word and can significantly affect the understanding of what is being presented. Moreover, there is a lot of non-verbal activity in videos which can contain crucial information. It is these parts that need to be explained to a visually impaired participant. If a visually impaired participant is extroverted and communicative, don't be afraid to ask them what they managed to catch from the video and add information that they could not observe. Visually impaired and legally blind participants might be able to use various types of electronic aids to make your presentation accessible to them. These can help them to sufficiently enlarge the presentation or video directly on their monitors.
Many modern presentations require active involvement of participants in the presentation in the form of various polling formats (on-line polls) that can be accessed via everyone's phone. This option is also available for visually impaired people if they are prepared for it in advance. They need to be able to find out whether the application you have chosen is accessible to them. That is why we recommend that you inform the participants about the tools you are planning to use before the event (for example, in the application form). A visually impaired person will be able to download the selected application in advance. This also allows them to try it and find out how accessible it is for them. Local organisations for visually impaired people will also be able to advise about the accessibility of various applications for visually impaired people since they carry out evaluations of the accessibility of various sites and applications.5), 7-9)
4.2 Rules of working in a group with a visually impaired participant
Here are some tips on how to involve a visually impaired participant if group work forms a part of your educational activity. When planning and implementing group activities, consider the following elements:
4.2.1 The place
It is necessary to prepare the space for group activities right at the start. A visually impaired person should be familiar with the space and needs to be informed about any changes to it immediately. We recommend asking one of the other attendees to help the visually impaired participant familiarise themselves with the environment. Do not forget that if the furniture is moved during group activities, it is necessary to state this fact out loud so that the blind participant can internally "update" the map of the room in which they move. It is equally important to ensure discipline with closing doors and windows so that they do not become an obstacle for the blind participant (this is especially true of obstacles at eye level that white cane cannot pick up).
4.2.2 Preparation of the group activity
Preparation of the group activity is discussed in Chapter 3. It is essential to instruct the participants to introduce themselves by name before speaking. This allows the visually impaired person to make connections between each person and their voice. Unlike everyone else in the group, a visually impaired person relies solely on their sense of hearing to recognise people.
4.2.3 Group size
The correct group size is one in which each member has their role. If this is not the case, and the groups are too large, i.e. several members have the same function, a task that requires almost no effort will automatically fall to a visually impaired member. This puts them in the passive position of an observer. Don't hesitate to suggest that a more introverted visually impaired person takes the role of a spokesperson for the group; the result may pleasantly surprise you.
4.2.4 Tasks, materials
These days, each lecturer uses various tried and tested materials in their group activities in addition to their quality presentation. Many of them can easily be adapted into an audio or sensory version or can be changed in another way. For example, if you are planning to use a game in which people choose two photos from several images depending on their current mood, you should describe all pictures and make a list of them available to the visually impaired participant in advance. If you do this during the game, a visually impaired person should be given enough time to go through the list of photos – it takes them about a third longer when compared to a population that does not have a vision problem.
For a visually impaired person to participate in activities based on non-verbal communication, it is necessary to modify them into an audio version. The basis of the activity should be preserved, but a visually impaired person should be able to actively participate in it at the same time.
In feedback activities, the participants must state their name before they start speaking so that a person with a visual impairment can associate the name with the sound of their voice. If objects are used during these activities, it is possible to simply sound them (wrap a ball in plastic, etc.). If the participants must change their seat, we recommend considering a suitable alternative for a visually impaired person. This way, they will remain involved despite their limited mobility (there are always other options; they do not have to be static).
For partially sighted and legally blind people, it is ideal if the materials use more contrasting colours, which simplify their visual perception.
If the group is smaller, you may want to consider a group activity in which none of the participants use their sight.
Suppose you do not want to change the activities you have prepared. In that case, you can make them available to the blind participant by designating another participant as their visual "interpreter" who can explain all the non-verbal information during the ongoing activity.
4.3 Conclusion
We believe that by applying the information from the previous chapters on how to prepare the environment and how to adapt knowledge and materials (Chapter 2), as well as information on how to sensitise permanent groups to working with visually impaired people (Chapter 3), in combination with advice from this chapter, you will be able to set up the training so that a visually impaired person can make full advantage of it in the same way as the other participants.
If you have questions during the preparation of the training that you did not find the answers to in this guide, do not hesitate to contact the local organisations that work with this target group.
4.4 Bibliography
- Rosenblum, Lawrence D.: See what I’m Saying: The Extraordinary Power of Our Five Senses, 2010
- Magnesen, Vernon A.: A Review of Findings from Learning and Memory Retentio Studies, 1983
- Whitmore, J.: Coaching for Performance, 2017
- https://www.teachingenglish.org.uk/blogs/english-kirsty/inclusive-classroom-–-working-blind-partially-sighted-students
- Prístupnosť informácií - navigation
- Měchura, Milan: Efektívna komunikácia a sprevádzanie osôb so zrakovým postihnutím. In: Príručka pre pracovníkov s mládežou. https://www.unss.sk/yalta/vystupy.php
- Metodická príručka pre tvorbu elektronických dokumentov. Kol. autorov. Bratislava: Slovak Union of the Blind and Visually Impaired, 2007.
- Lecký, P. Tvorba prístupných elektronických dokumentov. Bratislava: Centrum podpory študentov so špecifickými potrebami – Univerzita Komenského v Bratislave.
- Web Content Accessibility Guidelines (WCAG)